Thursday, July 21, 2016

Microsoft Service bus: Queue, Topic and Event Hub

Selecting between Queue, Topic and Event Hub:


Usage:

Queue:

The scenario for queue is almost clear. Each message will be receive only by 1 receiver.
Of course it is possible to have multiple senders and multiple receivers, but the key point is that each message will receive only to one of those receivers.

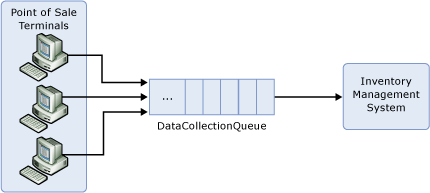
A simple example of using queues is POS (point of sale) systems. POS terminals produce some data with different load/times and the inventory management system has to process all of them. The inventory system and the Terminals are loosely coupled there might be different softwares in each terminal, but there is only 1 receiver on the other end.


Topic-subscription:

This type of queue will be used when a single message has to be received by multiple receivers. It is also possible to differentiate between receivers so a group of receivers will only receive special types of messages.
The same as queues, there can be multiple instances of sender/receivers (multiple receiver per subscription) is available, but when a receiver reads data from 1 subscription, the others cannot read it again from the same subscription.
A simple example for this scenario is logging/Search. You want to have an instance of your data to use in a logging (search) system, but there has to be no relation between your realtime system with the logging system rationally.

The second scenario is also possible when you want to divide your messages into different lines. Like when you want to create a priority queue, or when a set of producers produce data for different systems. 
A simple example for this would be when you create data in a way and process them in different manners. For instance if there is an ordering system registers orders for different companies, then each company only needs to know about its orders.

Event-Hub:

Event Hub is simply a big stream of data. In a way, Event hub is the answer for the same issues that we addressed in the Topics. There are multiple consumers for each message, but the big difference is that Event-hub has been implemented for maximizing the throughput.
Each Topic in event hub will multiple partitions (normally between 4 to 16) and 1 instance of the client will read from each partition. If any of the clients goes down or there are less clients that the partitions, clients will compete against each other to access to more partitions.

A simple scenario for this solution is logging players actions in a popular game. 

How they Access data

Queue:

There is only 1 line of messages. Clients wait for a message and when a new message received, only one of them will process it.

Topic-subscription:

There is only multiple lines of subscriptions. Clients of a subscription wait for data and the same scenario as queues happens here. It is important to note that there is no relation between data in different subscriptions.

Event-Hub:

Clients are responsible for the data that they read. Meaning that it is possible for different clients to read a message multiple time. Messages would not remove from system until a reasonable time (some days), or depending on size of data. 
Each client will ask the hub for data after special message (check point) so it is very possible to see some messages has been read multiple time when a client restarts.
There is a concept of Consumer Groups which is almost the same as subscription in the topic base service bus.

How to manage failure

Topic-subscription:

There is 2 ways of receiving a message:

1- PeekLock (default)

Data will be read by the client and it will be locked for some time. When the client finished its work, it simply tells to the broker that and the broker will remove the item from queue.
If an error happens in the process client can abandon the message, therefore another client would read the same message later on in case that the error was temporary.
Also, if the client crashes in the middle of the process, the lock will be time outed and the message will be readable for another client.

2-ReceiveAndDelete

The broker doesn't care about the probable errors. It simply say the message will be read 1 times max!

Event-Hub:

Messages will be in the hub for a long time, so we can be sure that data will be read by clients at least 1 time
Each client will set a check point after a portion of time (or any rule that the clients decides) and if it restarts, it will continue reading from that checkpoint again. So the client has to take care of duplicates it self.

Installation Environment

Queue and Topic-subscription are available on both Microsoft Azure (cloud) and on premise but Event-Hub is only available on the Azure.

Read More
Azure Event Hubs overview

Monday, July 18, 2016

Creating an email template engine - Part 1

Introduction

Sending emails is always one of the jobs that most customers want. Sometimes they want to send a welcome letter or some notifications or even a newsletter for the customers and so they ask for a module that they can use. Writing a method for sending emails takes less than 10 seconds these days (
SmtpClient.Send :) ) but creating a good content that can be flexible enough for the client to use and at the same time not much complex that make them suffer is a bit tricky. So In this post I will show you how to do it in a simple way.

Dividing the content

If you ask a client what content will you have in your emails, they will probably say everything is possible but they usually want to have the same design on most of their emails. It is a way to show that all of those emails are from the same company. Also, the one who writes the email content usually doesn't have any knowledge about the design, and you don't want to let him mess up with the CSS.
So in short you have these contents inside your email engine:
1- A HTML/CSS design form
2- Some placeholders for special data like customer name, Date, etc.
3- Some content that changes by the editor

Using MVC engine

Usually whenever we talk about HTML/CSS design, we think of how we do it using MVC, because as web developers that is what we do. By using MVC, we always separate our business from the view. Right? We never write anything inside the view so if the customer doesn't like the look of his pages, or if there was a change in theme or etc. it could be possible without us doing anything. And let me add that doing the front-end usually needs a good eye to see what is pretty and I myself don't have it :)
So, why not using MVC engine to create our email body? It is only a simple HTML page noting more.

Replacing the placeholders 

String processing is very easy in all programming languages, you just need to define strings that no one will use in a text. Something simple like having names with double hash in both sides like ##SomeName## will probably do the task. You can also use the simple string.Replace method but for the sake of both speed and flexibility I choose to work with RegEx library most of the time.

Implementing the code

Rendering the MVC view to string:

There is a very good post by Rick Strahl . He basically wrote a class to help him do some of the stuff easily:
public class ViewRenderer
{

protected ControllerContext Context { get; set; }

public ViewRenderer(ControllerContext controllerContext = null)
{
if (controllerContext == null)
{
if (HttpContext.Current != null)
controllerContext = CreateController().ControllerContext;
else
throw new InvalidOperationException(
"ViewRenderer must run in the context of an ASP.NET " +
"Application and requires HttpContext.Current to be present.");
}
Context = controllerContext;
}

public string RenderView(string viewPath, object model)
{
return RenderViewToStringInternal(viewPath, model, false);
}

public string RenderPartialView(string viewPath, object model)
{
return RenderViewToStringInternal(viewPath, model, true);
}

public static string RenderView(string viewPath, object model,
ControllerContext controllerContext)
{
ViewRenderer renderer = new ViewRenderer(controllerContext);
return renderer.RenderView(viewPath, model);
}

public static string RenderPartialView(string viewPath, object model,
ControllerContext controllerContext)
{
ViewRenderer renderer = new ViewRenderer(controllerContext);
return renderer.RenderPartialView(viewPath, model);
}

protected string RenderViewToStringInternal(string viewPath, object model,
bool partial = false)
{
ViewEngineResult viewEngineResult = null;
if (partial)
viewEngineResult = ViewEngines.Engines.FindPartialView(Context, viewPath);
else
viewEngineResult = ViewEngines.Engines.FindView(Context, viewPath, null);

if (viewEngineResult == null)
throw new FileNotFoundException("View did not find!");

var view = viewEngineResult.View;
Context.Controller.ViewData.Model = model;
string result = null;
using (var sw = new StringWriter())
{
var ctx = new ViewContext(Context, view,
Context.Controller.ViewData,
Context.Controller.TempData,
sw);
view.Render(ctx, sw);
result = sw.ToString();
}

return result;
}

public static T CreateController(RouteData routeData = null)
where T : Controller, new()
{
T controller = new T();


HttpContextBase wrapper = null;
if (HttpContext.Current != null)
wrapper = new HttpContextWrapper(System.Web.HttpContext.Current);

if (routeData == null)
routeData = new RouteData();

if (!routeData.Values.ContainsKey("controller") && !routeData.Values.ContainsKey("Controller"))
routeData.Values.Add("controller", controller.GetType().Name
.ToLower()
.Replace("controller", ""));

controller.ControllerContext = new ControllerContext(wrapper, routeData, controller);
return controller;
}
}

This class works very good giving you the opportunity to render your Razor view to HTML string.

Creating the viewModel
To work with MVC, you need to have a model to pass to the view and then in the view the designer knows what he has to create a good view.

Create a EmailTemplateBase so you can use it for different views depending on what you need to do and put your base stuff inside that. something like:
public class EmailTemplateBase
{
 public string Markup { get; set; }
public string BodyTextMarkup { get; set; }
}

Then you can inherit from it to have your special view or just use it as your view model.
Creating the Controller
Since we are using the .Net MVC, it is not possible to generate stuff without using a controller. So just create a simple controller:
public class mycontroller
{
public ActionResult Index(EmailTemplateBase model)
{
 return View(model);
}
}

Creating the view
It is the simple Razor MVC view and the viewmodel is the one that you've already created so I won't bother writing that :)

Replacing the name value tokens

I myself prefer to have this method in a helper class with extension methods so I can use it like text.ReplaceTokens(collection) but you can use it as a simple method without extentions.
public static string ReplaceTokens(this string text, NameValueCollection nameValueCollection)
{
foreach (var key in nameValueCollection.AllKeys)
{
 var replacementText = nameValueCollection[key] ?? "";
 text = Regex.Replace(text, key, replacementText, RegexOptions.IgnoreCase);
}
return text;
}

Creating the Email Body
To create the email body, you need to get the body markup from the DB where you put bodytext that you already took from the editor. also you need to have a list of namevalues that you want to replace somewhere. The namevalue collection has to have everything that is possible for the editor to use, but it has to be ok for him not using some or all of them.

public string CreateEmail(string bodyMarkupText, NameValueCollection tokenCollection)
{
 var url = "~/views/myPage/Index.cshtml";
 var model = new ReceiptViewModel()
 {
  BodyTextMarkup = bodyMarkupText
 };
 var bodyText = ViewRenderer.RenderView(url, model, null);

 return bodyText.ReplaceTokens(tokenCollection);
}

Now you just need to put the string as the email body and send the email to the user :)
Easy right?
Have fun :)

Thursday, July 14, 2016

EPiServer for beginers, where is version history

Version history is one of the basic features of any CMS and of course EPiServer has complete support over all of your pages and commerce data.
You might say that everyone knows that EPiServer has this feature, but to be honest I didn't expect to find it inside the gadgets pane the first time, so I thought why not mentioning it for beginners :)


So to see the version history follow these steps:
1-  In the editors page find the settings button on top right of your pane.


2- click on add gadgets

3- select "versions" gadget from the list


Version history is available for you. You can see who has done changes to the selected page and if the latest changes has been published or not :)

Thursday, July 7, 2016

Umbraco: Adding Gibe Link Picker to Macro parameters


Gabe link picker is one of the coolest add-ons  available for Umbraco 7. By installing it, you will have the option to select a link from inside your Umbraco project, or write the URL your self for an external link/mailto. You can read more about downloading/ using it from here.

However, one might want to use the link picker as macro parameter. To do so,go to your solution-> app_plugins>GabeLinkPicker>package.manifest


and then add isParameterEditor: true to the property editor. It should look like this:

Now if you open a macro type(or create one) and go to parameters tab, link picker will be one of your options as the parameter type.


Tuesday, July 5, 2016

umbracoRedirect The great hidden Property


I had a scenario that I wanted to redirect a page to another one in my Umbraco solution. I needed my page to be in my structure, but I didn't want it to show anything and I didn't want its url to be shown on the address bar. Then my friend Niels Damkjær showed me a good hidden feature in Umbraco.

There is no need to write code or do something hard. You just need to create a new field in your document type with alias umbracoRedirect and the editor has to be Content Picker. Thats all you need to do :) Something like this:


Then in your page you can select the tab for redirecting which is very cool. 
There is also a post in our Umbraco in here but you don't need to do it with those steps.


* After adding the field for the first time, it did not work for me, but when I restart my webserver it started to work fine.

* It uses the http 302 header to tel the browser to redirect to another page which is the temporary redirect command.